4. Running on Localhost
After you modified the code in the previous step, you are ready to create your first deployment and run your DAG in your development environment. To be more precise, you will use the deployment create command to create a new deployment object. Then you will use deployment build and deployment apply commands to build a Docker image and spin up Docker containers using Docker Compose in your development environment, and your apps and services will be up and running.
Prerequisites
For the local deployment commands to work properly, ensure you have installed and are running the following tools in your development environment:
- Docker
- Docker Compose
⚠️ Important: To install Docker (with Docker Compose) on MacOS visit www.docker.com/get-started website and follow the instructions. And make sure Docker is up & running by checking a visible Docker image on the MacOS status bar.
Install Docker Compose package
You will now add a code package that enables deployment of components on Docker Compose. For that, you need Docker Compose providers. Providers are code that convert components and links from the DAG into specific deployments.
For a detailed description of Torque Framework entities and their relations, check the Torque Framework section.
torque package install git+https://github.com/torquetech/torque-docker-compose-basics-provider.git && \
torque package install git+https://github.com/torquetech/torque-docker-compose-load-balancer-provider.git && \
torque package install git+https://github.com/torquetech/torque-docker-compose-postgres-provider.git && \
torque package install git+https://github.com/torquetech/torque-docker-compose-nginx-hlb-provider.git && \
torque package install git+https://github.com/torquetech/torque-docker-compose-provider.git
Creating Deployment
You want to create a local deployment for running the DAG locally inside the Docker Compose environment. For now, you have to list all providers that you need explicitly during deployment creation.
torque deployment create local \
  --provider=torque.docker_compose.V1Provider \
  --provider=torque.docker_compose_postgres.V1Provider \
  --provider=torque.docker_compose_load_balancer.V1Provider \
  --provider=torque.docker_compose_nginx_hlb.V1Provider \
  --provider=torque.docker_compose_basics.V1Provider \
  --extra-config dc.yaml
Notice that we referred to an additional configuration file dc.yaml, and this file should be in your root directory. You can create dc.yaml.
touch dc.yaml
And add the following content into it:
providers:
  torque.docker_compose.V1Provider:
    configuration:
      overrides:
        services:
          lb-impl:
            ports:
            - 8080:80
dag:
  components:
    lb:
      bonds:
        impl:
          implementation: torque.docker_compose_nginx_hlb.V1Implementation
          configuration:
            domain: example.com
Or you can download it from dc-v2.yaml.
curl -L https://github.com/torquetech/docs-examples/releases/download/docs/dc-v2.yaml > dc.yaml
☝️ Note: This is one of multiple ways you can add custom configurations to customize the functionality of components, links, and providers. There will be many more details soon on how configuration and customization in Torque works in a dedicated chapter.
This prepares your deployment for running the DAG locally. To list all deployments run:
torque deployment list
Command output:
- local-d35s
To get more details about local deployment, run:
torque deployment describe local
Command output:
name: local-d35s
context:
  type: torque.defaults.V1LocalContext
  configuration: {}
strict: false
providers:
- torque.docker_compose.V1Provider
- torque.docker_compose_postgres.V1Provider
- torque.docker_compose_load_balancer.V1Provider
- torque.docker_compose_nginx_hlb.V1Provider
- torque.docker_compose_basics.V1Provider
extra_configs:
- dc.yaml
filters: null
components: null
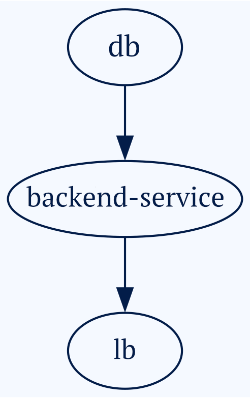
DAG Visualization
Now that you have deployment objects created, you can see what your system design looks like. The deployment command has a dot command to help with the visualization task.
⚠️ Important:
The dot command is not shipped with any OS distribution, and to install it follow the GraphViz installation instructions. On MacOS you can install it with brew install graphviz.
torque deployment dot local | dot -Tpng -o graph.png
This command generated a PNG file that represents the design of the system we have just created.
Resulting graph:

Running Locally
With a local deployment created and configured, you can run all components locally using Docker Compose. And in fact, Torque will handle Docker Compose for you without your intervention.
⚠️ Important: For the following commands to work, you need to have Docker installed and running on your laptop.
torque deployment build local
torque deployment apply local
The apply command for local deployment executes the docker compose command for the Docker images built during the build command. This created and started Docker containers.
To check the running app execute:
curl -H "Host: api.example.com" http://localhost:8080/backend-service
The output should be the current database time.
Database time: 2023-01-09T10:49:30.536818Z%